I am a Zivver admin
Configure and manage Zivver
Prerequisites and setup
Prerequisites
Please make sure you meet the following requirements before starting the installation of Cloud Sync:
An active subscription in the Azure tenant: You can use an existing subscription in Azure or create a new subscription. You need to have the Owner or Contributor role to edit this subscription.
Global Administrator (or similar) role in the Azure tenant: This is required to grant the automation account read access to Exchange Online.
Administrator permissions in Zivver: This is required to create an API key to connect to Zivver. If your organization uses Role-Based Access Control, this needs to be a full administrator account.
Claimed all domains that receive email: See How to claim a domain in Zivver for instructions on claiming your domains.
Optional: Create a source filter group: Create a (security) group in Azure if you want to synchronize only part of the mailboxes in the tenant. See the Cloud Sync FAQ to check which types of groups are supported.
user.objectid is used as the value for ZivverAccountKey. This is required for Cloud Sync to work properly.How to setup Cloud Sync
Please watch the video directly on YouTube if the video isn’t loading on this page.
Setup
This manual describes the steps to set up Cloud Sync in Azure.
Check synchronization results carefully before performing the synchronization. Please inform us if you experience any issues.
Click this button to deploy the automation account to Azure:
Login to your Azure administrator account. Fill in the fields of the form:
- Subscription, Resource Group and Region:
This is the location where the Azure Automation account for Cloud Sync will be placed in your Azure tenant. - Zivver Api Key:
Paste the API key that you generated in the Zivver administrator portal. The API key gives Cloud Sync access to your Zivver tenant. - Daily Start Time UTC:
Add the time that Cloud Sync should start on a daily basis in UTC. Choose a time that is outside of office hours for your organization. - Target Filter:
Specific mailboxes or domains entered will not be changed in Zivver. Use this filter if your Zivver admin account does not exist in the Exchange Online tenant. Separate values by comma (e.g. admin@it-supplier.com, externaldomain.uk). - Source Filter:
Enter the ObjectID of the group to be included in the sync. You can add multiple ObjectIDs to sync users from multiple groups. Only mailboxes that are members of these groups will be synced to Zivver. If the Group Filter is empty, all mailboxes from the Included Domains will be synchronised. Separate values by comma (e.g. b74fd2c0-3d1a-4b7a-bc88-123456789abc, e5b3d8e2-f3b4-4a8d-9b7d-abcdef123456). Find the Object ID(s) of groups by navigating to Groups in the Azure Portal. - Email Report Sender:
Enter the mail address of the sender of the email report. This should be a mailbox in the tenant (e.g. sender@domain.com). - Email Report Recipients:
Enter the mail address(es) of the recipient(s) of the email report. This can also be mailboxes outside of the tenant. Separate values by comma (e.g. recipient1@domain.com, recipient2@example.uk). - Organizational Units Domains:
Enable if you use organizational units that are based on the primary email addresses of mailboxes in Exchange Online. Each domain that corresponds to an organizational unit should be set as the OU-identifier in the Zivver Admin Portal. Do not use in combination with Organizational Units Groups. - Organizational Units Groups:
Enable if you use organizational units that are based on a specified security group. The UUID of each group that is used for this must be added as the OU-identifier of the corresponding organizational unit in the Zivver Admin Portal. Do not use in combination with Organizational Units Domains.
Click and on the next screen click .

- Subscription, Resource Group and Region:
Click in the top right corner on the Cloud Shell to start a PowerShell terminal. You don’t need to set up a storage location.

Warning
Other Powershell terminals not recommended
It is not recommended to use other PowerShell terminals than the Cloud Shell. The suggested PowerShell code may fail due to missing modules or authentication functionalities.To authenticate and start setting up the correct permissions, paste the following code in the terminal and hit Enter:
# Allow Graph Command Line Tools
Connect-MgGraph -Scopes AppRoleAssignment.ReadWrite.All,Application.Read.All,RoleManagement.ReadWrite.Directory
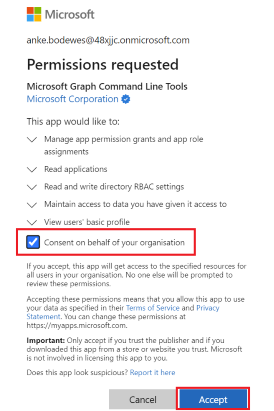
Allow Microsoft Graph Command Line Tools by following the steps suggested when you see in the Cloud Shell:
To sign in, use a web browser to open the page https://microsoft.com/devicelogin and enter the code [123456] to authenticate.
After successful authentication, run the below Powershell code to assign read permissions to Exchange Online. Verify that all code executed successfully. Do not close the Cloud Shell as you will need it for the next step.
# Get the ID of the Managed Identity
$ResourceId = (Get-AzADServicePrincipal -DisplayName "ZivverCloudSync").Id

# Assign API permissions Exchange Online
$AppRoleId = "dc50a0fb-09a3-484d-be87-e023b12c6440"
$MsOfficeId = (Get-MgServicePrincipal -Filter "DisplayName eq 'Office 365 Exchange Online'").Id

New-MgServicePrincipalAppRoleAssignment -ServicePrincipalId $ResourceId -PrincipalId $ResourceId -AppRoleId $AppRoleId -ResourceId $MsOfficeId

# Assign the Global Reader role
$RoleID = (Get-MgRoleManagementDirectoryRoleDefinition -Filter "DisplayName eq 'Global Reader'").Id

New-MgRoleManagementDirectoryRoleAssignment -PrincipalId $ResourceId -RoleDefinitionId $RoleID -DirectoryScopeId "/"

# Assigned permissions to read from Exchange Online
Tip
Do you get the error
[Could not load file or assembly 'Microsoft.Graph.Authentication, Version=2.26.1.0, Culture=neutral, PublicKeyToken=31bf3856ad364e35'. Assembly with same name is already loaded]? run the following commands in the Cloud Shell to fix this:Get-InstalledModule Microsoft.Graph* | Uninstall-Module -Force Remove-Module Microsoft.Graph* -Force Install-Module Microsoft.Graph -AllowClobber -ForceTo send the email report, Cloud Sync requires permission to send emails for the sending mailbox. Paste the following code in the Cloud Shell:
# Connect to Exchange Online
Connect-ExchangeOnline

# Create a mail enabled security group with only the Sender as member
$AutomationAccount = Get-AzResource -ResourceType "Microsoft.Automation/automationAccounts" | Where-Object { $_.Name -eq 'ZivverCloudSync' }

$sender = Get-AzAutomationVariable -AutomationAccountName $AutomationAccount.Name -Name "CLOUD_SYNC__EMAIL_REPORT_SENDER" -ResourceGroupName $AutomationAccount.ResourceGroupName

$mesg = New-DistributionGroup -Name "Zivver Cloud Sync Mail Report" -Members $sender.value -Type "Security"

# Restrict Mail.Send Permission to only this security group
New-ApplicationAccessPolicy -AppId $ResourceId -PolicyScopeGroupId $mesg -AccessRight RestrictAccess -Description "Restrict Mail.Send permission for Zivver Cloud Sync."

# Assign Graph API Mail.Send Permission to the Managed Identity
$AppRoleId = "b633e1c5-b582-4048-a93e-9f11b44c7e96"
$MsOfficeId = (Get-MgServicePrincipal -Filter "DisplayName eq 'Microsoft Graph'").Id

New-MgServicePrincipalAppRoleAssignment -ServicePrincipalId $ResourceId -PrincipalId $ResourceId -AppRoleId $AppRoleId -ResourceId $MsOfficeId

# Assigned permissions to send email from a specific mailbox
In the Azure tenant, search Automation Accounts and open the Automation Account called ZivverCloudSync.

In the Automation Account, search Runbooks and open the ZivverCloudSyncLoader runbook.

In the runbook, click Start and then . Cloud Sync will now run a preview without making any changes.

Wait a few minutes and validate the accounts to be created, updated and disabled that Cloud Sync proposes in the Output tab or in the email report. Any warnings or errors are displayed under Warnings and Errors. Read the troubleshooting documentation for more information.
If you are happy with the proposed changes, you can run the first synchronization. Navigate to the ZivverCloudSyncLoader runbook and click Start. Add the following two parameters:
perform_sync: this ensures that the sync is not in preview anymore.allow_large_sync: this is needed because this is the first sync. Without this parameter, Cloud Sync will not allow creating, updating, or suspending more than 10% of the accounts.
Optionally, you can add the following parameters if you want to split the synchronization jobs for user mailboxes and shared mailboxes. This is useful, for example, for certain desired filters, or when you have a large number of mailboxes and may run into Microsoft’s fair use policy of max. 3 hours runtime for one job.
sync_users: this ensures only user mailboxes are synced.sync_groups: this ensures only shared mailboxes are synced.
Click and the synchronization will create and update the accounts in Zivver.

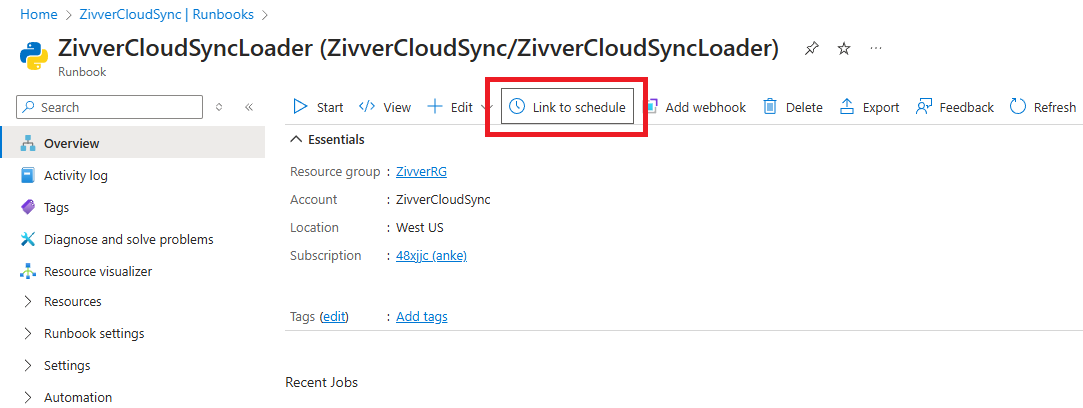
If you are happy with the proposed changes, you can enable the schedule. In the ZivverCloudSyncLoader, click Link to schedule.

Click Schedule and link the runbook to the ZivverCloudSyncSchedule.

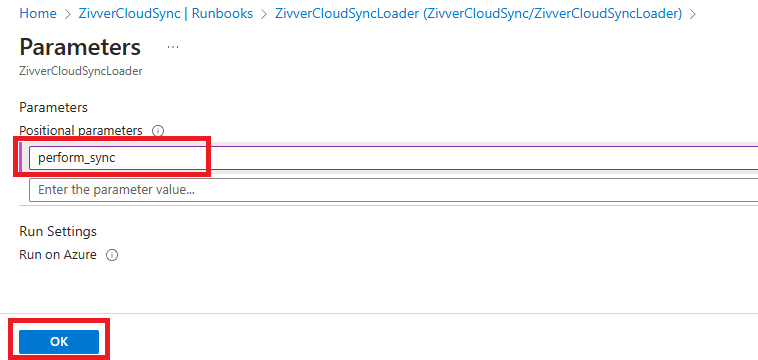
Click Configure parameters and run settings and add the
perform_syncparameter. Click .
Cloud Sync will now run automatically on a daily basis. If you have enabled the email reports, an email report will be sent after every run.
Recommended: If everything was set up successfully, the Microsoft Graph Command Line Tools are not needed anymore. You can remove them by navigating to Enterprise Applications. In this section, search the Microsoft Graph Command Line Tools application and verify that the creation date is the day of this Cloud Sync setup (to ensure the application was not created earlier for something else). Open the application and delete it.
